
Hello my friends, this time I will discuss how to create a sliding menu using Adobe Flash CS3. Well I will not give speeches at length, we just practice.
Step 1: Open the program Adobe Flash your existing computer. Then create a new document with (Ctrl + N) or select File - New on the menubar. Set size in the Document Properties with widht: 220px height: 200px and Background color: # 333 333. then click OK.

Step 2: In this step select the rectangle tool by pressing the "R" on your keyboard. Draw a rectangle with widht size: 190 px and height : 20 px Background color: # 666666. Let the rectangle is still selected, press F8 to make it Hollywood. follow the image below.

Step 3: Double click on the rectangle object, and then replace the name of Layer 1 to Background by double-click on the text layer. Then add a new layer by clicking on the insert layer, and name it "bgslide". click insert another layer and name it text, click the insert layer again and name the action. so the results are as shown in the picture below.

Step 4: In this step, we will make the animation. Select frame 1 on layer bgslide, press "R" to activate the Rectangle tool. Draw a rectangle with widht: 4 px, height: 20px. Background color: # 66CC33. Consider the following picture:

Step 5: Select Frame 1 Layer text make the word "TEXT" with the Text Type: Dynamic text, fonts
size: 10px, font: Arial. and give instant name: txt.


Step 6: Let the text object remains active, and then click F8 give name: "btext", still in an active text object named in the instant name: btntext. See the following figure:


Step 7: click on frame 20 on layer and drag the action down to the Background layer and press F6 (insert keyframe). see the results in the following figures:

Step 8: Click on frame 10 drag down until the background layer and press F6 (insert keyframe). Then right click and select Create Shape Tween. repeat again at frame 1 layer bgSlide and Background. note the image below:


So the end result like the picture below:

Step 9: Click on frame 10 background layer, click on the current object rectangle and change its color on the properties panel with the following color codes: # CCCCCC
Step 10: Select Frame 10 bgslide layer and click Subselection Tool (Press the "A" on your keyboard). Then arrange for square footage as shown on the image below :

Step 11: Select the frame is a text layer, then on the properties panel at the tween field select: "motion" view picture properties panel below:

Step 12: Then in the fifth frame the text layer press F6. Repeat step 5 on the frame was, at frame 10 and frame 15 (granting insert keyframe by pressing F6). See the results below:

Step 13: In the fifth frame shear layer text text object to the right. See the results below:

Step 14: Still on the current text object at frame 5, click the object and the properties panel to change color. follow the following caption:

Step 15: Repeat steps 13 -14 to 15 this Frame. confirm the position and color of text objects in Frame 15 is identical to Frame 5.

It appears we have finished making animated sliding menu button. but not until our work there. After making animation in Hollywood menuSlide. Just let us finish this job, come on!!. Now we return to the scene first, by double-clicking on the workspace or click on a scene that is under layer. note the following images:

Step 17: Ok now select the object menuSlide in the work area, duplicate objects up to four times the menu so it will be like the image below:

Step 18: Select the object first menuSlide (the top). on the properties panel give the name of instant name: b1. Do the same on the second menuSlide object and give it instant name: b2, on the third menuSlide give instant object name: b3, last provided instant name: b4, the object manuSlide to four.
See the following figure:


Step 19: If you have all given instant menuSlide object name, now select the text tool or press "T" menuSlide put on the object and give it instant name "me". see picture below
Step 20: Now click on the insert layer (to add a layer above the layer 1). Change its name to the script. After that press F9 and enter the script:
b1.onRollOver = over;
b1.onRollOut = out;
b1.btntext.txt.text = "> HOME";
b2.onRollOver = over;
b2.onRollOut = out;
b2.btntext.txt.text = "> ABOUT US";
b3.onRollOver = over;
b3.onRollOut = out;
b3.btntext.txt.text = "> PROFILE";
b4.onRollOver = over;
b4.onRollOut = out;
b4.btntext.txt.text = "> CONTACT US";
function over(){
this.gotoAndPlay(2);
stop();
};
function out(){
this.gotoAndPlay(11);
stop();
};
// teks menu sliding
menu.text = "MENU SLIDING";
Good creative and successful always. get the original files from the results of this tutorial. please download here SlidingMenu.fla
Step 1: Open the program Adobe Flash your existing computer. Then create a new document with (Ctrl + N) or select File - New on the menubar. Set size in the Document Properties with widht: 220px height: 200px and Background color: # 333 333. then click OK.

Image 1: Click Ctrl + N to display the Document Properties
Step 2: In this step select the rectangle tool by pressing the "R" on your keyboard. Draw a rectangle with widht size: 190 px and height : 20 px Background color: # 666666. Let the rectangle is still selected, press F8 to make it Hollywood. follow the image below.

Image 2 : Create a symbol with the type of movie clips menuSlide
Step 3: Double click on the rectangle object, and then replace the name of Layer 1 to Background by double-click on the text layer. Then add a new layer by clicking on the insert layer, and name it "bgslide". click insert another layer and name it text, click the insert layer again and name the action. so the results are as shown in the picture below.
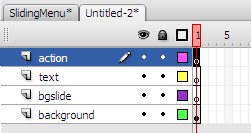
Image 3: Work area symbol menuSlide
Step 4: In this step, we will make the animation. Select frame 1 on layer bgslide, press "R" to activate the Rectangle tool. Draw a rectangle with widht: 4 px, height: 20px. Background color: # 66CC33. Consider the following picture:

Image 4: Create a rectangle with rectangle tool
Step 5: Select Frame 1 Layer text make the word "TEXT" with the Text Type: Dynamic text, fonts
size: 10px, font: Arial. and give instant name: txt.

Image 5: Create a text object on the Text layer in frame 1

Image 6: Giving the name of instant name: txt text in objects
Step 6: Let the text object remains active, and then click F8 give name: "btext", still in an active text object named in the instant name: btntext. See the following figure:

Image 7: The Symbol in the text object with the name btext

Image 8: the position of the text which have become symbols

Image 9: Panel Properties instant naming name: btntext on text objects
has become a symbol
Step 7: click on frame 20 on layer and drag the action down to the Background layer and press F6 (insert keyframe). see the results in the following figures:

Image 10: Creating insert keyframe by dragging action of the frame layer to layer 20
i>background
Step 8: Click on frame 10 drag down until the background layer and press F6 (insert keyframe). Then right click and select Create Shape Tween. repeat again at frame 1 layer bgSlide and Background. note the image below:

Image 11: Results of the selection frame 10 and drag the bottom and press F6

Image 12: Right-click and select Create Shape Tween

Image 13: Right click on Create a shape tween on frame 1 and the background layer bgslide
So the end result like the picture below:

Image 14: The result of giving a shape tween on the layer and background bgslide
Step 9: Click on frame 10 background layer, click on the current object rectangle and change its color on the properties panel with the following color codes: # CCCCCC
Step 10: Select Frame 10 bgslide layer and click Subselection Tool (Press the "A" on your keyboard). Then arrange for square footage as shown on the image below :

Image 15: Changing the animated rectangles layer at frame 10 bgslide
Step 11: Select the frame is a text layer, then on the properties panel at the tween field select: "motion" view picture properties panel below:

Image 16: The panel properties, the selection of motion tween
Step 12: Then in the fifth frame the text layer press F6. Repeat step 5 on the frame was, at frame 10 and frame 15 (granting insert keyframe by pressing F6). See the results below:

Image 17: The insert keyframe on layer text in frames 50-10 and 15
Step 13: In the fifth frame shear layer text text object to the right. See the results below:

Image 18: The object of the text that has been in the shear
Step 14: Still on the current text object at frame 5, click the object and the properties panel to change color. follow the following caption:

Image 19: Change color: Tint: # 66cc33: 100%, Blend: Normal
Step 15: Repeat steps 13 -14 to 15 this Frame. confirm the position and color of text objects in Frame 15 is identical to Frame 5.
Write the script in the Action layer
Step 16: Select Frame 1 on the actions layer and press F9, type in the panel action script: stop ( );, and select insert keyframe frame 10 give or press F6, then press F9 to the action panel, typing the same script also ie stop ( ); see the results on the following image:
Image 20: Giving a script on frame 1 and 10
It appears we have finished making animated sliding menu button. but not until our work there. After making animation in Hollywood menuSlide. Just let us finish this job, come on!!. Now we return to the scene first, by double-clicking on the workspace or click on a scene that is under layer. note the following images:

Image 21: The result of the displacement layer 1 to layer scene
Step 17: Ok now select the object menuSlide in the work area, duplicate objects up to four times the menu so it will be like the image below:

Image 22: Results of duplicate objects menuslide
Step 18: Select the object first menuSlide (the top). on the properties panel give the name of instant name: b1. Do the same on the second menuSlide object and give it instant name: b2, on the third menuSlide give instant object name: b3, last provided instant name: b4, the object manuSlide to four.
See the following figure:

Image 23: Example of instant name on the first object with the name menuSlide b1

Image 24: Each object is assigned name name b1-b4 instant
Step 19: If you have all given instant menuSlide object name, now select the text tool or press "T" menuSlide put on the object and give it instant name "me". see picture below

Image 25: Adding a text object and providing instant name "me"
Step 20: Now click on the insert layer (to add a layer above the layer 1). Change its name to the script. After that press F9 and enter the script:
b1.onRollOver = over;
b1.onRollOut = out;
b1.btntext.txt.text = "> HOME";
b2.onRollOver = over;
b2.onRollOut = out;
b2.btntext.txt.text = "> ABOUT US";
b3.onRollOver = over;
b3.onRollOut = out;
b3.btntext.txt.text = "> PROFILE";
b4.onRollOver = over;
b4.onRollOut = out;
b4.btntext.txt.text = "> CONTACT US";
function over(){
this.gotoAndPlay(2);
stop();
};
function out(){
this.gotoAndPlay(11);
stop();
};
// teks menu sliding
menu.text = "MENU SLIDING";
Good creative and successful always. get the original files from the results of this tutorial. please download here SlidingMenu.fla
Title : Creating animated flash sliding menu
Description : Hello my friends, this time I will discuss how to create a sliding menu using Adobe Flash CS3 . Well I will not give speeches at length, we...
Description : Hello my friends, this time I will discuss how to create a sliding menu using Adobe Flash CS3 . Well I will not give speeches at length, we...


0 Response to "Creating animated flash sliding menu"
Post a Comment
Please give positive comment here,"NOT SPAM"